Slay the Spire — A Long-Horizon Reasoning Benchmark
Long-horizon tasks are all the rage these days. Many new model releases come with claims about how many hours of autonomous work a model can do and how many steps it can take without losing the thread.
But what's a good task to measure how well models reason over a long time horizon? It should have clear rules and make it easy to measure performance. It should also require lots of decisions that require deep thinking. Those decisions should be consequential both at short and long time horizons, with later decisions depending on earlier ones if possible.
We believe that Slay the Spire, a roguelike deck building game, is a great fit given these requirements. One run of the game consists of hundreds of consecutive decisions, with randomized events sprinkled in that force the player to adapt on the fly.
To put our hypothesis to the test, we let 11 frontier models play the game, each at 3 reasoning effort levels, on 5 game scenarios, 10 runs per combination. Along the way, we try to answer two questions:
- Is Slay the Spire actually a good measure of long-horizon reasoning?
- And which models are the strongest?
Why Slay the Spire
Slay the Spire is a (frighteningly addictive) roguelike deck-building game released by Mega Crit in 2019. The player picks one of four characters and climbs a spire in three acts, 50 floors in total. Each character has its own cards and game mechanics and requires a different strategy.

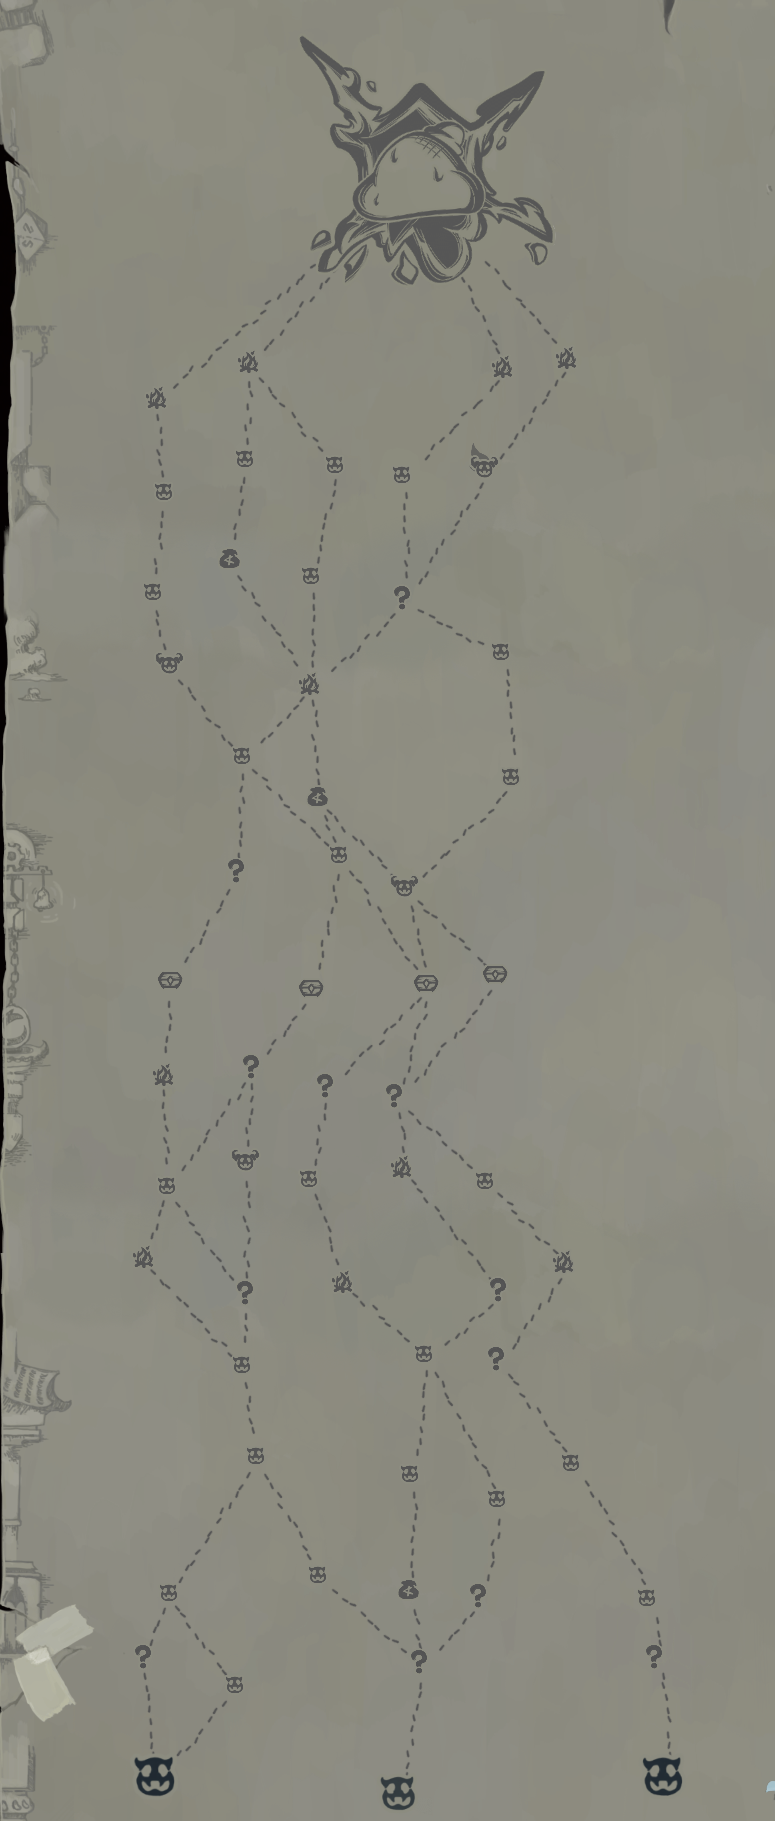
Each act consists of 15 floors with multiple rooms each and with a boss on the top floor. Each room is one of: a regular fight, an elite fight, a shop, a rest site, a treasure room, or an unknown room that is usually some special event. On every floor, the player chooses which connected room on the next floor they want to enter. A short fourth act ends at the Corrupt Heart, the game's true final boss. It is only open to players who collected three keys on the way up. Killing the Heart is worth a lot of points, so a player who wants the top score has to plan for those keys from Act 1 on.
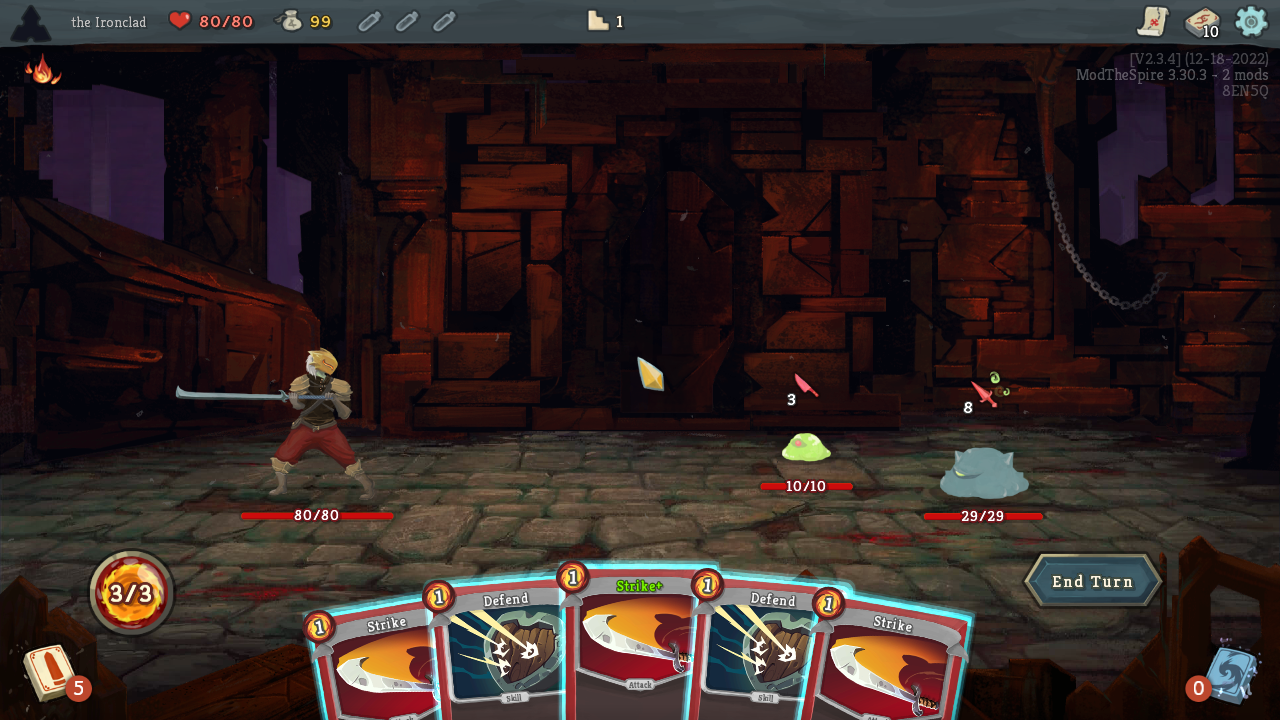
Fights are turn-based card battles. Enemies announce what they will do in their next turn, so every combat turn is a little tactical puzzle in itself. The player starts with a small deck of basic cards and builds a stronger deck over time by finding, buying, removing, or upgrading cards.
What makes Slay the Spire interesting as a benchmark for long-horizon planning is that it requires careful decisions at three different time scales:
- Short term: Making good tactical decisions during combat is crucial to preserve health points and stay alive to keep the run going.
- Medium term: The player can see the full map with all possible paths for the current act. Planning a path that maximizes returns while not being too risky is crucial.
- Long term: Deck building spans the whole run. Picking the right cards early on can unlock strong synergies later in the run or make future acts and boss fights easier.
Runs are seeded, so the same actions give the same result, but the player does not know the seed and cannot predict what they will draw. The seed determines card draws, battle rewards, and event outcomes. That means the player has to form a plan, see how it works out in practice, and adapt their strategy as the run progresses.
The game also offers a lot of variety without any changes to the benchmark harness. The four characters play differently, different seeds give different maps, and the game includes some built-in rule modifiers that change the game's mechanics.
Last but not least, every run results in a single numerical score, which makes it easy to compare runs. Reaching a floor, killing enemies, beating elites and bosses, beating them without taking damage, and various end-of-run bonuses for deck size, relics, gold, and max HP all add points (full formula). The large number of score modifiers means that two runs that reached the same floor vary in score based on how the run was played, which adds a lot of strategic depth to the game.
Building the harness
We built the benchmark using 🥕 Karotte, our open-source framework for building RL environments (GitHub). The model plays the real game (V2.3.4), running headless inside a container. The game itself has no API, but the game's community has built an awesome modding ecosystem. ModTheSpire loads mods into the game, BaseMod provides the hooks that most mods depend on, and MCPTheSpire exposes the game state and the available actions via an MCP server.
We run ModTheSpire and BaseMod as unmodified upstream builds but we added over 50 patches on top of MCPTheSpire to make playing the game as smooth as possible from a model's perspective. A small supervisor process sits between the model and the mod and owns the run. It starts the run with the configured seed, character and ascension (difficulty) level, and it filters out some commands that the mod would otherwise expose for saving, loading, and abandoning runs. Every tool call the model makes goes through the supervisor, which records the command and the resulting game state, so the full rollout is logged. When the run ends, the supervisor writes the outcome and rejects any further tool calls. Act 4 is normally locked until the player has won with three different characters, and the game disables it for runs with custom modifiers. We patched that gate out so every run can go for the Heart.
The model only gets tools to interact with the game, no shell. The tools are text-based, no screenshots involved. They enable what a human player would be able to see and do on screen: read the current screen, show the act map, play a card, end the turn, select rewards, use or discard a potion, proceed, confirm, skip, and cancel. A batch tool lets the model execute a sequence of multiple actions in a single call. Every action returns the new screen state and a short summary of what happened, for example, what actions the enemies executed and how much damage the model took.
A run has a wall clock limit of 8 hours and a turn limit of 2,000, where a turn is one model response. No run came close to either: the longest run took 5.6 hours and 984 turns. All tested models have context windows of at least 500K tokens and there is no automatic compaction.
Game knowledge is not required
We want the benchmark to measure models' long-horizon capabilities, not how much they know about Slay the Spire. We cannot stop a model from using what it learned about the game during training without changing the game itself, but we can make sure that it doesn't need that knowledge. A capable model should be able to do well in the benchmark when given a description of the game and the scoring formula. As a consequence, the model must be able to look up all the game mechanics during a run, the equivalent of a human player reading up on the game in an online wiki as they play.
So we added a lookup tool that provides information about any card, relic, potion, buff, enemy, etc. by name, extracted directly from the game to ensure correctness. Additionally, the instructions explain the game's rules and spell out exactly how the score gets calculated.
Model ergonomics
We want to reduce the friction that models encounter when interacting with the game so that they can focus on the actual task of playing the game. We therefore went through multiple iterations of letting models play the game and then looking at run logs for recurring tool calling errors or soft-locked runs. When models repeatedly made the same mistakes, we treated that as an environment issue and fixed it by improving the tool interfaces. Two examples:
- The game describes buffs and debuffs from the point of view of whoever has them. The description of the "Weakened" condition used to say
Attacks deal 25% less damage. One model read Weakened applied to its own character as reducing the damage it was about to take, expecting to take less damage, and died. Another one, down to 14 HP in a fight, paused to work out "whether my weakness is reducing my output or the enemy's". We fixed this so that the state names who is affected:Your attacks deal 25% less damageorThis enemy's attacks deal 25% less damage. - Enemy attacks were shown as a damage number and a hit count, for example
{"hits": 2, "damage": 16}for two hits of 16. One model read that as "16 damage across 2 hits of 8 each" and died to the attack. We fixed the state to show damage per hit, the number of hits, and the total:{"hits": 2, "total_damage": 32, "damage_per_hit": 16}.
The benchmark
We ran the benchmark across 11 models. Nine were picked from the top of the Artificial Analysis intelligence index on September 9, 2026. Grok 4.7 came out while the benchmark was running and replaced Grok 4.6. Opus 5.5 and GPT-6 Sol came out after the benchmark finished, and we added them before publishing. Each model was run at the minimum and maximum reasoning effort available, as well as a medium effort level. The table below shows the models, the providers we used, and what the effort levels map to in the providers' APIs.
| Model | Provider | Min | Medium | Max |
|---|---|---|---|---|
| GPT-6 Astra | OpenAI | low | medium | max |
| GPT-6 Sol | OpenAI | low | medium | max |
| GPT-5.6 Sol | OpenAI | low | medium | max |
| Fable 5.1 | Anthropic | low | medium | max |
| Opus 5.5 | Anthropic | low | medium | max |
| Muse Spark 1.3 | Meta | minimal | medium | max |
| GLM 5.3 | Together AI | low | high | max |
| Grok 4.7 | xAI | low | medium | xhigh |
| Kimi K3 | Together AI | low | high | max |
| Gemini 3.8 Flash | Google Vertex AI | low | medium | high |
| Qwen 3.8 2.4T A95B | Together AI | low | medium | xhigh |
We searched over 100M seeds to find scenarios that exercise very different aspects of the game. For each seed we generated the map of the first act and counted the number of monsters, elites, events, shops, rest sites, forks on the map, and the number of possible routes to the first boss.
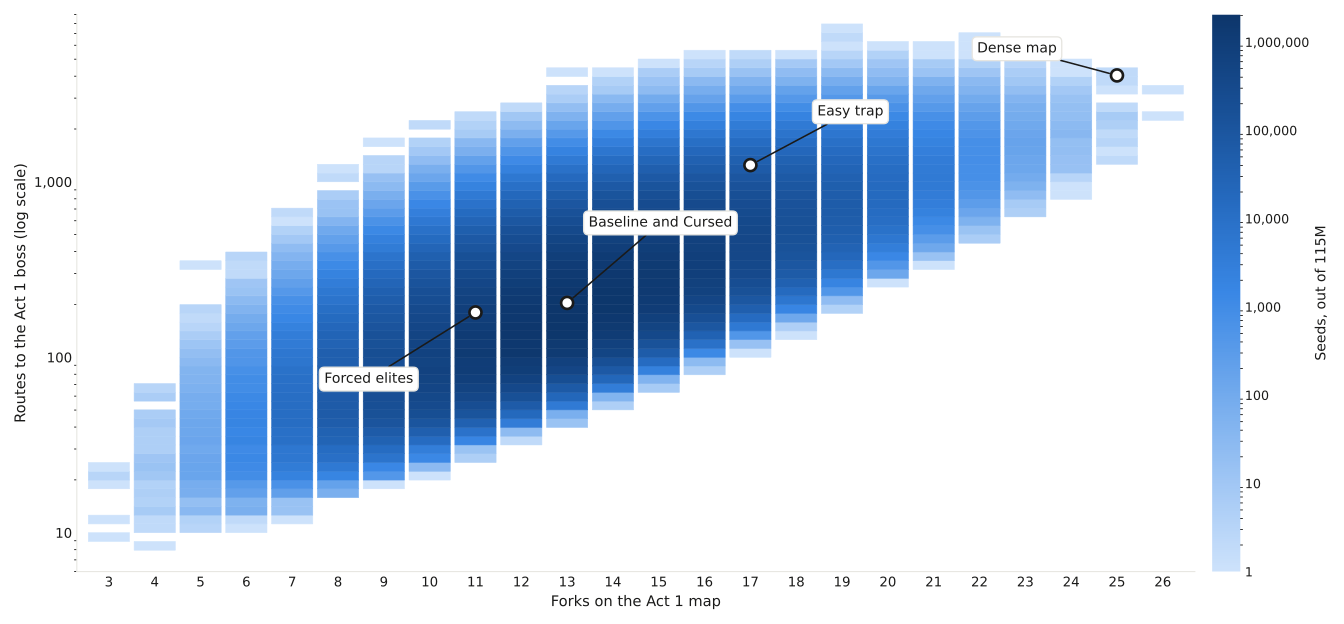
The scenarios we ultimately used for the benchmark are as follows:
Baseline: Play as the Ironclad, seed 8EN5Q, ascension 0. This scenario has the exact population-median Act 1 map on every metric (26 monsters, 4 elites, 12 events, 3 shops, 10 rests, 13 forks, 204 routes), with Slime Boss as the Act 1 boss. It represents a typical run of the game.
Cursed: Play as the Silent, same seed as baseline, ascension 0, "Cursed" modifier. The modifier forces the player to obtain curses (cards with negative effects) but at the same time buffs them for every curse they have. Trading off the pros and cons of being cursed adds an additional layer of complexity to this scenario.
Easy trap: Play as the Defect, seed Q776W, ascension 0, Guardian as the Act 1 boss. This scenario lets the player trade difficulty for higher scores. They can choose a path that only requires a single combat before reaching the boss, allowing them to climb floors quickly. However, they can also choose to take a much harder path with up to 5 elite encounters, which can yield a higher score.
Dense map: Play as the Watcher, seed 286QJD, ascension 0, Guardian as the Act 1 boss. The map has 25 forks (almost twice as many as the baseline) and 4,040 possible routes through Act 1. It is one of the most decision-dense scenarios we could find that does not force any elite fights, giving the player a lot of opportunity for strategizing. The Watcher is a strong character if played well, but its stance mechanics take effort to manage.
Forced elites: Play as the Ironclad, seed C5W7N, ascension 1, Hexaghost as the Act 1 boss. This scenario is the hardest of the five on paper because ascension level 1 increases the chances of encountering elites. We took this to the limit by finding a map that forces at least 3 elite encounters in Act 1, with no path around them. Additionally, the Act 1 boss is Hexaghost, which is considered the hardest of the three Act 1 bosses.
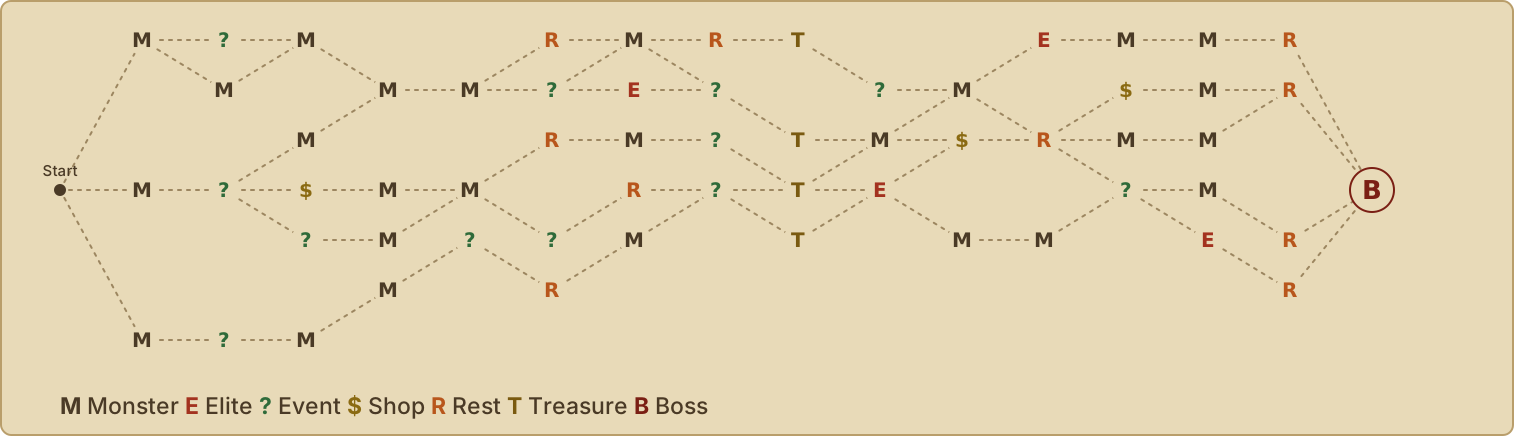
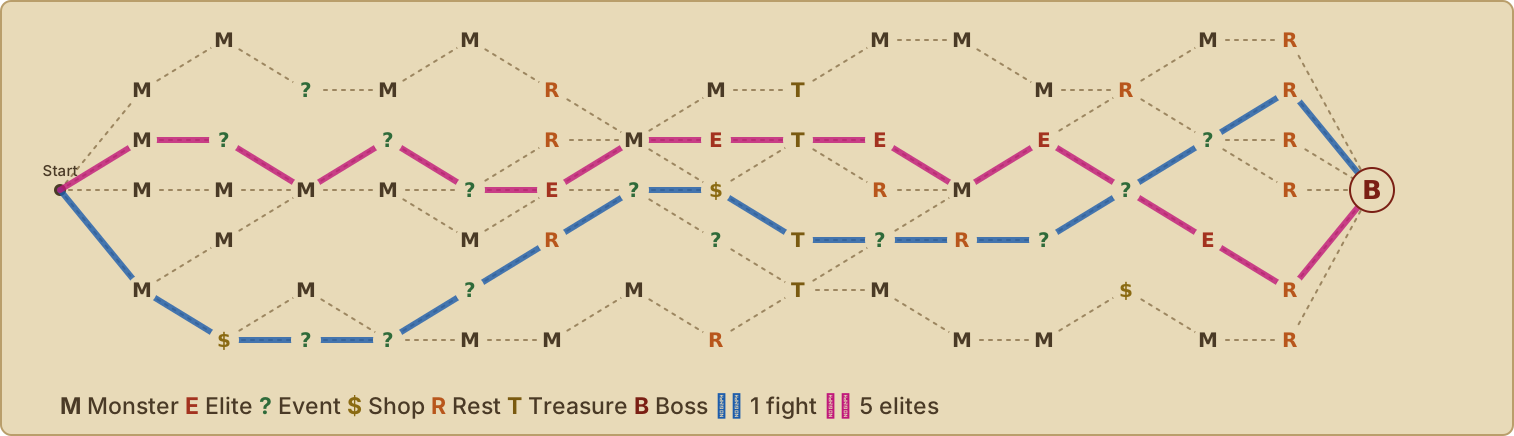
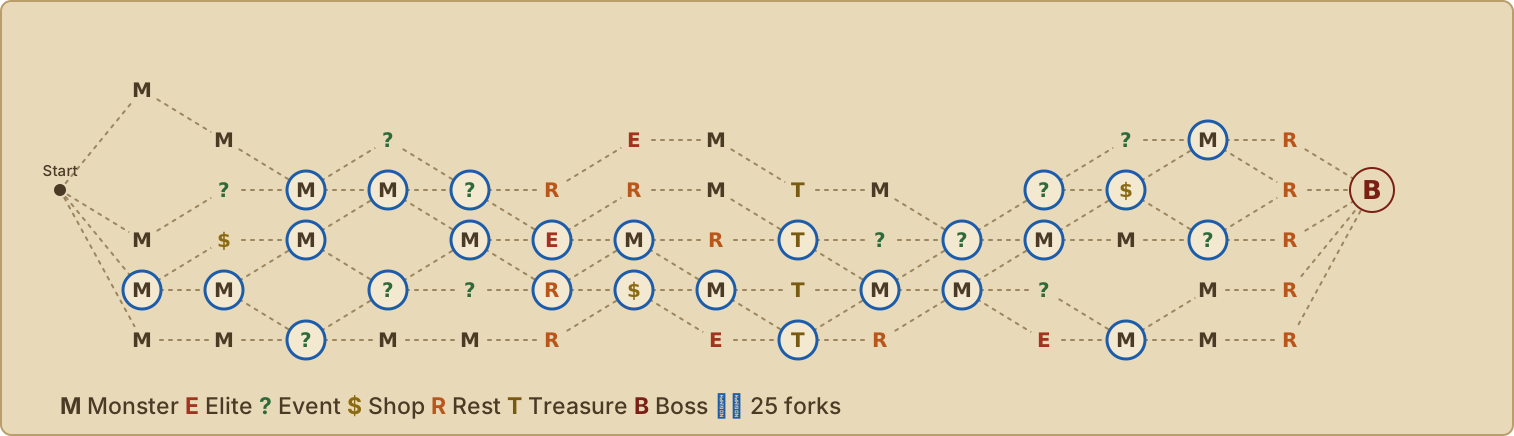
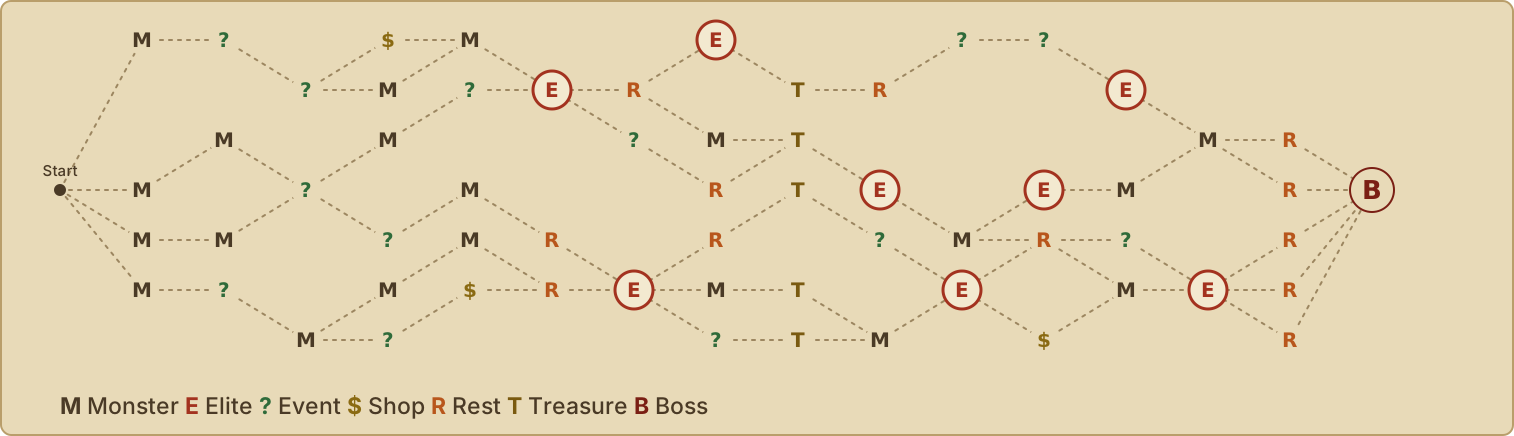
If you want to try the scenarios yourself, start a run with the character, seed and ascension level given above. For the Cursed scenario, pick the Cursed Run modifier in Custom mode. To reach the Heart your profile needs Act 4 unlocked, which requires a previous win with each of the Ironclad, the Silent and the Defect. The Cursed scenario cannot reach Act 4 at all without a custom patch.
The full benchmark consists of 11 models x 3 reasoning effort levels x 5 scenarios x 10 runs = 1,650 runs.
Results
The results below cover all 1,650 runs. Grok 4.7 has a 500K token context window and 5 of its deepest runs reach the limit in Act 3 or 4. We scored those runs where they stopped, so Grok's numbers are biased low. In 3 runs, Opus 5.5 beat the final boss and then stopped one click before the victory screen. We scored those where they stopped as well, which cost them the bonuses that only a win gets (50 to 275 points per run).
Who plays best
We use the game's native scoring system (how it's calculated). Reaching the Act 1 boss is worth about 100 points, a win without the Heart about 700, and a win with the Heart 1,500 or more. Scores are pooled over the five scenarios; the tabs show each scenario on its own.
Long story short: GPT-6 Astra is in a league of its own. It won 79% of its runs, never died before Act 3, and 27 of its 31 deaths were to the Heart, the final boss. Behind it, Gemini 3.8 Flash, Opus 5.5, GPT-6 Sol and Fable 5.1 trade places depending on the effort level. Across all efforts, Gemini, Fable and GPT-6 Sol won 26 to 27% of their runs. Opus 5.5 only won 17% overall because it only wins often at max effort (34%). Every other model won 7% or less.
Does more reasoning help?
Yes, increasing the reasoning effort generally leads to better performance, especially going from min to medium effort. Gemini is a great example for this. At min effort, it plays like, well, a bot. At medium effort, its median score beats every other model except Astra. GPT-6 Sol is the odd one out: it barely thinks more at medium effort than at min effort. Its scores go up in three scenarios and down in two, the biggest drop being Cursed, where it wins 9 of 10 runs at min effort and only 5 at medium effort.
From medium to max effort, most models behave as you would expect: max effort is as good as medium effort or better. Opus 5.5, GPT-6 Sol, Astra and Muse Spark gain at max effort in all five scenarios, Opus 5.5 by about 400 points on average and GPT-6 Sol by about 250. For Gemini, GPT-5.6 Sol, Grok, GLM, Kimi and Qwen the difference is within noise.
Fable is the exception: it gets clearly worse with more reasoning. At max effort it scores 130 points less on average than at medium effort, and its median drops by 230 points. The drop comes from three of the five scenarios (Cursed, Easy trap and Forced elites); on the Baseline and the Dense map max effort is slightly ahead. Fable writes about three and a half times as many tokens per response at max effort and uses them to play more cautiously outside of combat and more recklessly inside it. It turns down trades that cost max HP but strengthen the deck, and in boss and elite fights it ends more turns without enough block, losing 40% more HP per enemy attack than at medium effort with the same cards in hand. On the Easy trap scenario, half of its max effort runs died to the Act 2 boss, where none of its medium effort runs did. In one of those runs, Fable walks into the boss fight with 67 of its 75 HP and loses all of it in 15 turns.
Nobody can play the Watcher
The dense map is the worst scenario for every model. However, the map is not the reason: its routes have fewer elites than the baseline and models used 74 different paths in Act 1. The real challenge is playing as the Watcher.
Her core mechanic is Wrath, a stance that doubles both the damage she deals and the damage she takes.
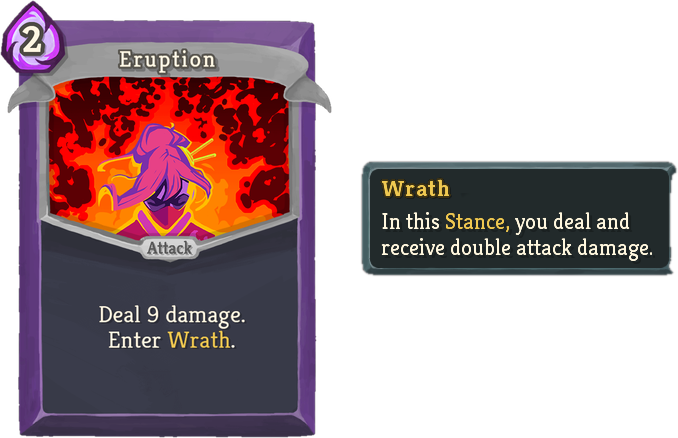
The trick is to enter it for attacking and leaving it again before the enemy acts. Unfortunately, the models mostly fail at the second part. 39% of all Watcher deaths happened with Wrath active. In most of those turns the model had entered Wrath that same turn and had no card in hand to leave it. Even Astra ends 19% of its attack turns in Wrath, which is a big part of why it only wins 27% of its Watcher runs, despite being the strongest model overall.
The reasoning traces show that the models know and understand the rule. Turns that ended in death in Wrath mention the doubled incoming damage about as often as Wrath turns under attack that the model survived (25% against 21%). We read the reasoning of the 62 Wrath deaths where the model wrote enough for us to judge:
- 16 were fights that were already lost no matter what.
- In 13, mostly at min effort, the model planned with the undoubled damage and only noticed its mistake when the enemy's attack number doubled.
- In 12, the model knew it had to leave Wrath but had not considered how and had no card or energy left to do it.
- In 11, it took the double damage on purpose, bet on killing the enemy first, and failed.
- In 5, it counted the double damage but got the math wrong, for example by missing that an attack hits several times.
- In another 5, it wrongly assumed it would kill the enemy first or that the enemy would not attack.
The clip below is from one of Fable's runs and a prime example of why Slay the Spire requires really deep tactical thinking when in combat. The enemy is about to hit for 70, but due to a special mechanic of this enemy, every point of damage Fable deals lowers that attack. Fable enters Wrath to double its own damage and brings the attack down to 49, but forgets that Wrath also doubles the damage it takes. It ends the turn with 51 block against 98 and dies. Its own post-mortem: "Had I stayed out of Wrath [...], I'd have survived with block to spare".
Where models die
- Weak models die early. Qwen died in Act 1 in 117 of its 150 runs, Muse Spark in 92, Kimi in 79 and GLM in 67. They die to ordinary fights and the Act 1 elites as much as to the bosses. They also die rich, with 30 to 40% of the gold they earned unspent, rest (heal) at campfires instead of upgrading cards despite being healthy, and Muse Spark died holding an unused potion in 64% of its deaths.
- Fable almost never dies in Act 1, but half of its deaths happen in Act 2.
- GPT-6 Sol dies in Act 2 even more often, in 65 of its 111 lost runs.
- Opus 5.5 gets far enough to die to the Heart in 53 runs, more than any other model.
- Gemini dies everywhere and has by far the widest spread of any model: the same scenario at the same effort can score 100 or 1,700.
Taking Astra to the limit
Let's take a closer look at the clear winner of this benchmark. Astra's skill does not come from thinking during the run. At min effort it writes about 35 tokens per response, reasoning included, and it only looked something up once in 50 runs. It still wins 84% of those runs, scores 1,377 points on average, and beats every other model at any effort level in each of the five scenarios. Writing that little does not work for other models: GPT-6 Sol also writes 35 to 38 tokens per response at min and medium effort and scores about 440 to 520. For comparison, Fable writes 180 to 730 tokens per response and Opus 5.5 150 to 1,080. Astra also plays like a machine, taking the same path through each map in almost every run, making the fewest tool errors, and losing the least HP of any model in the first fight (which is identical for every run of a scenario).
So Astra already knows how to play Slay the Spire when the run starts. We can't tell from the outside where that knowledge comes from, whether it is training on the game itself, the many guides and discussions about it online, or something else. Either way, the benchmark measures something different for Astra than for the other models, because they have to work the game out as they go.
However, we also went a bit easy on the models, seeing that many of them already struggled at low ascension levels. If you want to gain a Spire veteran's respect, you gotta show that you can consistently beat the game at the maximum difficulty level: ascension 20.
After putting Astra to the test, its win rate drops from 86% at max effort to 20%, and the ways in which it dies go from the Heart alone to a dozen different fights. It still reaches at least Act 3 in 64% of its runs, which is extremely strong. Despite the increased difficulty, Astra at max effort still barely thinks: it writes about 55 tokens per response, about the same as at max effort in the regular benchmark.
While it is fascinating to see Astra play the game at such a high level, it also means that Slay the Spire is not a good measure of its planning capabilities, since it doesn't plan all that much. The obvious next step would be to change the rules of the game so that prior knowledge stops helping. But we gotta leave something for future research.
What it costs
The whole benchmark cost about $48,000 in inference, including the Ascension 20 runs. Astra and Fable alone account for almost 60% of it.
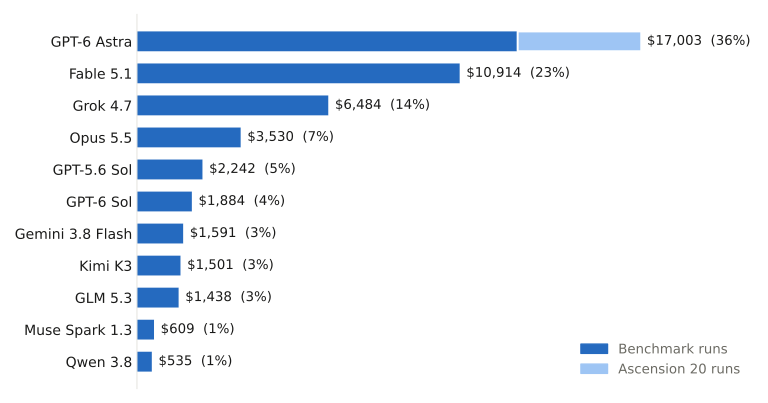
Gemini at medium effort is the clear value pick, with a mean score of 833 at a mean cost of $12 per run. Above that, Opus 5.5 at max adds about 100 points to the mean for $44 per run, and Astra at min effort has a mean score of 1,377 for $64 per run. Astra at max costs 67% more per run for a 9% higher mean score. Fable's mean score sits at 660 to 790 for $60 to $86 per run, below Gemini medium at five to seven times the price.
Conclusion
Let's circle back to the two questions we asked in the beginning.
Is Slay the Spire a good measure of long-horizon reasoning? Yes. Scores range from early Act 1 deaths to Heart kills, so there is good separation between weak and strong performers. Higher reasoning efforts generally lead to higher scores and the ways in which models fail are mostly planning failures, despite having all necessary information available. The execption is Astra. It already knows the game when the run starts, so the benchmark measures how well it knows how to play the game more than planning. Changing the game rules so that prior knowledge doesn't help as much may be an interesting approach to closing that gap.
Which models are the strongest? GPT-6 Astra, by a wide margin: it wins 79% of its runs and almost all of its losses are to the final boss. Behind it, Gemini 3.8 Flash, Opus 5.5, GPT-6 Sol and Fable 5.1 trade places depending on the effort level. At max effort, Opus 5.5 has the second-highest mean score and GPT-6 Sol the second-highest win rate. If you care about cost, Gemini at medium effort is the clear value pick.
And nobody can play the Watcher.
Full report and videos
Every run of the benchmark, including the Ascension 20 runs, is available on ai-plays-slay-the-spire.com with interactive transcripts and videos.
Help us build what comes next
Preference Model is a superintelligence data research company aiming to ensure AI goes well for everyone. The biggest problem we see with current AIs is that they don't always do what we intend. Perhaps it's because they're not capable, or perhaps it's because they are insufficiently aligned. Both come down to what they were trained on: train a model on enough bad environments and you get a model that does bad things. We're addressing both of these issues in the most direct, highest leverage way available to us. This means researching how to build RL environments better, not just for the AIs of today but for the superintelligences of tomorrow.
Over the past year, we've built RL environments for several frontier labs, and we're backed by $16M in seed funding led by a16z, with participation from SignalFire, South Park Commons, Scale Angel Group, and researchers including Fei-Fei Li, Ian Goodfellow, and Julian Schrittwieser.
If you want to join us in our mission to ensure AI keeps working in humanity's best interests, we'd love to hear from you: email hello@preferencemodel.com, or see our open roles.